Sandbox Your AI Dev Tools: A Practical Guide for VMs and Lima
AI coding assistants, npm, pip, and other development tools can run arbitrary code and scripts on your machine, potentially stealing SSH keys, API tokens, wallet keys, sensitive credentials and other private data without you noticing.
This guide shows you how to sandbox these tools in isolated VMs using Lima, so you can experiment and develop freely without putting your sensitive data at risk. Jump straight to the guide, or read on for a bit of personal context.
Contents
Personal context
I’ve been having quite a bit of fun with AI assisted coding recently.
I use LLMs for a wide range of things, including discussing architecture, design choices, learning about new tools and libraries I wasn’t previously aware of, to reviewing PRs and quickly cranking out dirty prototypes.
Especially for hobby projects that are not meant to ever go into production, I enjoy playing with AI tools fast and loose, producing results quickly and not getting slowed down by annoying things such as reading code before running it 🤣.
And yeah… that’s obviously unsafe, unless it’s all contained in a sandbox!
You should never run potentially dangerous, experimental code on your main machine, since it could steal your passwords, API keys, environment variables, private keys, access to your communication tools, install services, and do all sorts of other nefarious things.
Nowadays I isolate all my devtools in VMs, and thought it might be useful to others if I put together a guide to shows how to do it. Well, here it is, and I hope it’ll be useful to you, too!
You’ll want to run the entire development environment, including the AI tool itself, inside a sandbox. This way it’s safe to install dependencies and to execute code, and unlocks other fun features like snapshots before running sketchy code, and reverting if something goes wrong.
And it’s not just AI-generated code. Node.js/npm/yarn and Python/pip are particularly troublesome because they allow any package to run arbitrary scripts on your system during installation, and install tons of additional dependencies that can do the same. This attack vector is called “supply chain attack” and it happens all the time.
Why VMs over Docker?
Virtual Machines (VMs) and Containers (i.e. Docker, Podman, containerd) are the two most practical methods for isolating development tools from your host operating system. VMs provide much stronger protection and more flexibility overall, and are better suited for co-developing with AIs.
Container runtimes share the host operating system’s kernel, which means they’re fundamentally running on the same system as your main machine, just with isolated namespaces and resource limits. This creates several security concerns:
- Kernel vulnerabilities: If malicious code finds a kernel exploit, it can potentially escape the container and access the host system. These exploits are discovered regularly, and you’re betting that your kernel is fully patched and has no zero-days.
- Shared resources: Containers share the same kernel, which means they’re accessing the same system calls, device drivers, and kernel modules. This expanded attack surface has led to numerous container escape vulnerabilities over the years.
- Limited isolation: While containers provide process and filesystem isolation, it’s more of a convenience boundary than a true security barrier. Tools like
docker run --privilegedor mounting host directories can easily weaken or bypass these protections, and AI-generated code might do exactly that without you noticing.
In contrast, a VM runs its own complete operating system with its own kernel. The hypervisor (like QEMU/KVM) creates a much stronger isolation boundary. Even if malicious code completely compromises the VM, it would need to exploit the hypervisor itself to reach your host, a significantly harder target.
Furthermore, a VM enables better concurrency. It can run Docker containers, databases, web servers, multiple build processes, and background services all at once, and the AI tool can interact with everything naturally just like on a normal development machine.
Lima VM introduction
In this guide, we use Lima VM to sandbox AI and devtools. Lima is a delightful, lightweight virtual machine manager for Linux and macOS which provides easy and quick ways to create and manage VMs.
You interact with Lima through the limactl command:
# List all VM instances
limactl list

# Create a new VM using the "default" template (Ubuntu 25.10 + home directory mount)
limactl start --name dev template:default

# Open a shell
limactl shell dev

# Open a shell with SSH
ssh -F ~/.lima/dev/ssh.config lima-dev

# Restart
limactl restart dev

# Delete a VM instance
limactl delete dev -f

# Show a list of available templates
limactl start --list-templates

# Start an instance using another template and a custom name
limactl start --name dev template:debian
Notes:
- Lima mounts your entire home directory from the host into the VM by default, which is something we want to avoid to protect our files. The guide below shows how to do that using custom VM templates.
- Lima places all VM related configurations and files into the
~/.limadirectory (specifically~/.lima/<vm_name>/and~/.lima/_config/).
About Lima:
- https://lima-vm.io
- https://github.com/lima-vm/lima (20k stars)
- https://jvns.ca/blog/2023/07/10/lima--a-nice-way-to-run-linux-vms-on-mac
- https://www.youtube.com/watch?v=2SGyhd5OI-c
- Lima is part of Linux Foundation’s Cloud Native Computing Foundation (CNCF)
Lima Templates:
VMs are based on templates, which can include (build on) other templates:
- https://github.com/lima-vm/lima/blob/master/templates/default.yaml
- https://github.com/lima-vm/lima/blob/master/templates/ubuntu-25.10.yaml
- https://github.com/lima-vm/lima/blob/master/templates/README.md
Install Lima
The Lima VM docs have platform-specific installation guides.
Homebrew is recommended on macOS:
# Install
brew install lima

# Update
brew upgrade lima
On Linux install the binary like this:
VERSION=$(curl -fsSL https://api.github.com/repos/lima-vm/lima/releases/latest | jq -r .tag_name)
curl -fsSL "https://github.com/lima-vm/lima/releases/download/${VERSION}/lima-${VERSION:1}-$(uname -s)-$(uname -m).tar.gz" | tar Cxzvm /usr/local
curl -fsSL "https://github.com/lima-vm/lima/releases/download/${VERSION}/lima-additional-guestagents-${VERSION:1}-$(uname -s)-$(uname -m).tar.gz" | tar Cxzvm /usr/local
Now ensure your Lima version is up-to-date:
$ limactl --version
limactl version 2.0.1
Getting started
In this section, we will:
- Prepare a shared directory
- Setup VM defaults
- Start a first VM instance
Let’s dive right in!
Prepare a shared directory
We only want to share very specific host directories with the VM.
Let’s create ~/VM-Shared on the host, which we later mount into the VM at ~/Shared (with write access):
mkdir ~/VM-Shared
You can use that directory to easily copy files between the host and the VM, and to share project directories from the host with the VM.
Setup VM defaults
Defaults for all VMs can be defined in ~/.lima/_config/default.yaml.
Let’s enable the following:
- Mount
~/VM-Sharedfrom the host (on~/Sharedinside the VM). - Forward ports from the VM to the host (i.e. the range from 8000 to 9000).
- CPUs and memory the VM is allowed to use (defaults: 4 CPUs and 4 GiB RAM, 100GiB disk space)
Let’s create the default YAML file:
cat > ~/.lima/_config/default.yaml << EOF
mounts:
- location: "~/VM-Shared"
  mountPoint: "{{.Home}}/Shared"
  writable: true

portForwards:
- guestPortRange: [8000, 9000]
  hostPortRange: [8000, 9000]

# Adjust these based on your system and preferences
cpus: 6
memory: 16GiB

EOF
Notes:
- As part of these defaults, you may want to share additional project directories.
- You can also adjust all these settings per instance. Either edit the config when starting a VM, or update the instance configuration in
~/.lima/<vm_name>/lima.yamlafter the VM started, and reboot it afterwards. - Port forwarding might stop working after the host machine suspends, and reactivating may need a VM restart.
Prepare easy SSH access
Lima conveniently creates default SSH configuration files for all VM instances, which makes it easy to log in with SSH (including using VS Code for a Remote-SSH session).
I recommend using a ~/.ssh/config.d/ directory on the host and have SSH include all configs there by default. That allows us to simply link the Lima-created config files there to use them.
Create the directory:
mkdir ~/.ssh/config.d
Add this as first line in your ~/.ssh/config file, to make SSH include all configs from there:
Include config.d/*
Great! After creating a new VM, we can now simply create a symlink to the Lima-generated SSH configs and use it to SSH into the instance.
Start a VM
Let’s start an Ubuntu 25.10 VM instance, named dev.
We use the internal _images/ubuntu-25.10.yaml template because it doesn’t include the automatic home directory sharing:
limactl start --name dev -y template:_images/ubuntu-25.10.yaml
Notes:
- Using the
-yflag automatically starts the VM without asking first whether you want to edit the instance configuration. - Instead of using an internal template, you can also manually disable home directory sharing, by editing the template when starting the VM or afterwards by editing
~/.lima/<vm_name>/lima.yaml.
Useful commands to manage the VM lifecycle (click to expand).
# Restart the VM
limactl restart dev

# Stop the VM
limactl stop dev

# Start the VM
limactl start dev

# Delete the VM
limactl delete dev -f
Share project-specific directories
You can share additional project-specific directories between host and VM in several ways:
- Edit the instance configuration before starting it (by not using the
-yflag) and adjust themountssection. - Edit the instance configuration after it’s started by editing
~/.lima/<vm_name>/lima.yamland rebooting the instance. - Creating a custom template and launching the instance based on that (more complex but could be useful for repeated use cases).
SSH into the VM
Create a symlink for the SSH config file and SSH into the VM:
# Create a symlink for the SSH config file
ln -s ~/.lima/dev/ssh.config ~/.ssh/config.d/lima-dev

# SSH into the VM
ssh lima-dev

# Once inside the VM, look around...
metachris@lima-dev:~$ uname -m
aarch64

metachris@lima-dev:~$ uname -a
Linux lima-dev 6.17.0-5-generic #5-Ubuntu SMP PREEMPT_DYNAMIC Mon Sep 22 09:50:31 UTC 2025 aarch64 GNU/Linux

metachris@lima-dev:~$ ls -alh
total 36K
drwxr-xr-x 7 metachris root      4.0K Nov 19 12:32 .
drwxr-xr-x 3 root      root      4.0K Nov 19 12:31 ..
-rw-r--r-- 1 metachris root       116 Nov 19 12:31 .bashrc
drwx------ 2 metachris metachris 4.0K Nov 19 12:32 .cache
drwxr-xr-x 5 metachris root      4.0K Nov 19 12:32 .config
drwxrwxr-x 3 metachris metachris 4.0K Nov 19 12:32 .local
-rw-r--r-- 1 metachris root       116 Nov 19 12:31 .profile
drwx------ 2 metachris metachris 4.0K Nov 19 12:31 .ssh
-rw-r--r-- 1 metachris root       116 Nov 19 12:31 .zshrc
drwxr-xr-x 3 metachris metachris   96 Nov 19 09:55 Shared
#                the mounted Shared folder is here ^^^^^^
🎉 Success!
Update services and setup bash
Let’s update the services on the instance, and configure git:
# Update the system
sudo apt-get update
sudo apt-get upgrade -y
sudo apt-get install -y vim screen htop iotop sysstat smem ccze jq build-essential ca-certificates pkg-config libssl-dev

# Setup git author info
git config --global user.name "Your Name"
git config --global user.email "[email protected]"
git config --global core.untrackedCache false
# git config --global core.editor "vim"  # optional

# Create a .bash_profile file that loads .bashrc (SSH sessions use it)
echo 'if [ -f ~/.bashrc ]; then . ~/.bashrc; fi' >> ~/.bash_profile
I like to add a few opinionated goodies to /etc/bash.bashrc which drastically improve the bash experience (click to expand).
sudo tee -a /etc/bash.bashrc > /dev/null << 'EOF'

# Long bash history!
export HISTSIZE=262144
export HISTFILESIZE=262144

# Path and default editor
export PATH=$PATH:/usr/local/go/bin:~/go/bin/:~/.local/bin
export EDITOR="vim"
unset MAILCHECK

# General aliases
alias ll='ls -alh'
alias htop="htop --sort-key=PERCENT_CPU"
alias sr="screen -d -r"
alias as="apt search"
alias ai="sudo apt-get install"
alias s="systemctl status"
alias j="journalctl -o cat"
alias v="git describe --tags --always --dirty=-dev"
alias myip="curl -4 ifconfig.me/ip"

# Git aliases
alias g="git"
alias gs='git status -sb'
alias gd="git diff"
alias ga='git add'
alias gb='git branch'
alias gc='git commit'
alias gl='git log --pretty=format:"%h %ad | %s%d [%an]" --graph --date=short'
alias ggo="git checkout"
alias gds='git diff --staged'
alias gca="git commit -a --amend"

EOF
Test port forwarding
Let’s confirm that port forwarding works. We do this using a one-liner Python HTTP server (on port 7777) inside the VM, and accessing it from the host:
# In the VM, start the HTTP server
metachris@lima-dev:~$ python3 -m http.server 7777
Serving HTTP on 0.0.0.0 port 7777 (http://0.0.0.0:7777/) ...

# On the host, make a HTTP request to the server
$ curl localhost:7777
<!DOCTYPE HTML>
<html lang="en">
...
Everything works, yay! 🎉
Install tools and languages
This section guides you through installing several other languages and development tools, including Golang, Node.js, Python, Rust, Docker.
We can accomplish that either by installing each tool according to it’s documentation, or by using a version manager such as mise (“mise-en-place”, 22k stars on Github) which can install hundreds of tools via a simple command-line interface.
Using Mise-En-Place
First, we install mise (“mise-en-place”, 22k stars on Github) and make bash support it:
# Install mise
curl https://mise.run | sh

# Make bash know about it
echo 'eval "$(~/.local/bin/mise activate bash)"' >> ~/.bashrc
You use mise latest <tool> to see the latest versions it knows about:
$ mise latest node
25.2.1
$ mise latest go
1.25.4
$ mise latest rust
1.91.1
$ mise latest python
3.14.0
Now you can install all the tools you want in a single command:
mise use --global nodejs go rust cargo
Golang
To manually install (or update) Golang in the VM, download the latest release and extract into /usr/local/go:
# Download latest release
GO_LATEST=$(curl -s 'https://go.dev/dl/?mode=json' | jq -r '.[0].files[] | select(.os=="linux" and .arch=="arm64") | .filename')
curl -L "https://go.dev/dl/$GO_LATEST" -o go.tar.gz

# Extract and cleanup
sudo rm -rf /usr/local/go && sudo tar -C /usr/local -xzf go.tar.gz
rm go.tar.gz
The Golang path needs to be in the PATH environment variable, which we have already added before.
Verify the installation:
$ go version
go version go1.25.4 linux/arm64
Node.js
A good way to install a current version of Node.js in Ubuntu is by using nvm, a modern node version manager (90k stars on GitHub):
# Install nvm
curl -fsSL https://raw.githubusercontent.com/nvm-sh/nvm/v0.40.3/install.sh -o nvm-install.sh
bash nvm-install.sh

# Update the environment
source .bashrc

# Install Node.JS long-term support
nvm install --lts
Now it’s all installed and ready to use! Check the versions like this:
metachris@lima-dev:~$ node -v
v24.11.1
metachris@lima-dev:~$ npm -v
11.6.2
Docker
Perhaps you don’t even need Docker, since Lima includes containerd and nerdctl by default. This is a Docker-compatible runtime and command-line interface that can also run images from Docker Hub:
# List running containers
$ nerdctl ps
CONTAINER ID    IMAGE    COMMAND    CREATED    STATUS    PORTS    NAMES

# Start a container from an image from Docker Hub (i.e. https://hub.docker.com/_/nginx)
$ nerdctl run nginx

# nerdctl is also compatible with docker-compose
$ nerdctl compose up
If you do want to install Docker, the quickest way to install it by using their official get-docker.sh script:
# Download and execute the installation script
curl -fsSL https://get.docker.com -o get-docker.sh
sudo sh get-docker.sh

# Add the VM user to the docker group
sudo usermod -aG docker $USER
For the group changes to take effect, exit the shell and re-login (may need a VM restart).
Verify that user is in the ‘docker’ group:
$ groups $USER
metachris : metachris docker

# Now you can interact with Docker
$ docker ps
CONTAINER ID   IMAGE     COMMAND   CREATED   STATUS    PORTS     NAMES
GitHub CLI
GitHub CLI provides a useful gh cli command that let’s you easily interact with GitHub and private repositories.
You can install it in the VM following the Linux installation instructions:
(type -p wget >/dev/null || (sudo apt update && sudo apt install wget -y)) \
	&& sudo mkdir -p -m 755 /etc/apt/keyrings \
	&& out=$(mktemp) && wget -nv -O$out https://cli.github.com/packages/githubcli-archive-keyring.gpg \
	&& cat $out | sudo tee /etc/apt/keyrings/githubcli-archive-keyring.gpg > /dev/null \
	&& sudo chmod go+r /etc/apt/keyrings/githubcli-archive-keyring.gpg \
	&& sudo mkdir -p -m 755 /etc/apt/sources.list.d \
	&& echo "deb [arch=$(dpkg --print-architecture) signed-by=/etc/apt/keyrings/githubcli-archive-keyring.gpg] https://cli.github.com/packages stable main" | sudo tee /etc/apt/sources.list.d/github-cli.list > /dev/null \
	&& sudo apt update \
	&& sudo apt install gh -y
Warning: Authorizing GitHub CLI to access private repositories will leave an API key in the VM which could potentially be stolen by unauthorized scripts (which is what we wanted to avoid in first place by running everything in a VM).
Only authorize it with gh auth login for private repo access if you accept the risks! I personally avoid having any sensitive credentials in the VM, in particular those that allow access to private GitHub repositories.
Visual Studio Code - Remote-SSH Session
If you prefer an IDE like VS Code, you can use Remote-SSH to start a session inside the instance.
Please note that this is potentially unsafe, as explained in the Remote-SSH README:
Security Note Using Remote-SSH opens a connection between your local machine and the remote. Only use Remote-SSH to connect to secure remote machines that you trust and that are owned by a party whom you trust. A compromised remote could use the VS Code Remote connection to execute code on your local machine.
See also this discussion on GitHub for more context and information.
If you want to connect anyway:
- Press
Shift + cmd + Pto open the command palette - Type
sshand chooseRemote-SSH: Connect to Host... - Choose
lima-dev(your SSH targets should automatically show up there)


Now a new VS Code window opens, and sets up VS Code Server:

Then you can click “Open” and choose a folder, like Shared:

Claude Code, Codex and Gemini
Before setting up the tools, let’s create a “Hello World” directory in the Shared folder as our playground:
# Create the hello world directory and change into it
mkdir -p ~/Shared/HelloWorld
cd ~/Shared/HelloWorld

# Create an empty README.md
touch README.md
Claude Code
Let’s start with installing Claude Code in the VM, following the instructions in the documentation:
Install Claude Code CLI:
curl -fsSL https://claude.ai/install.sh | bash
Start Claude:
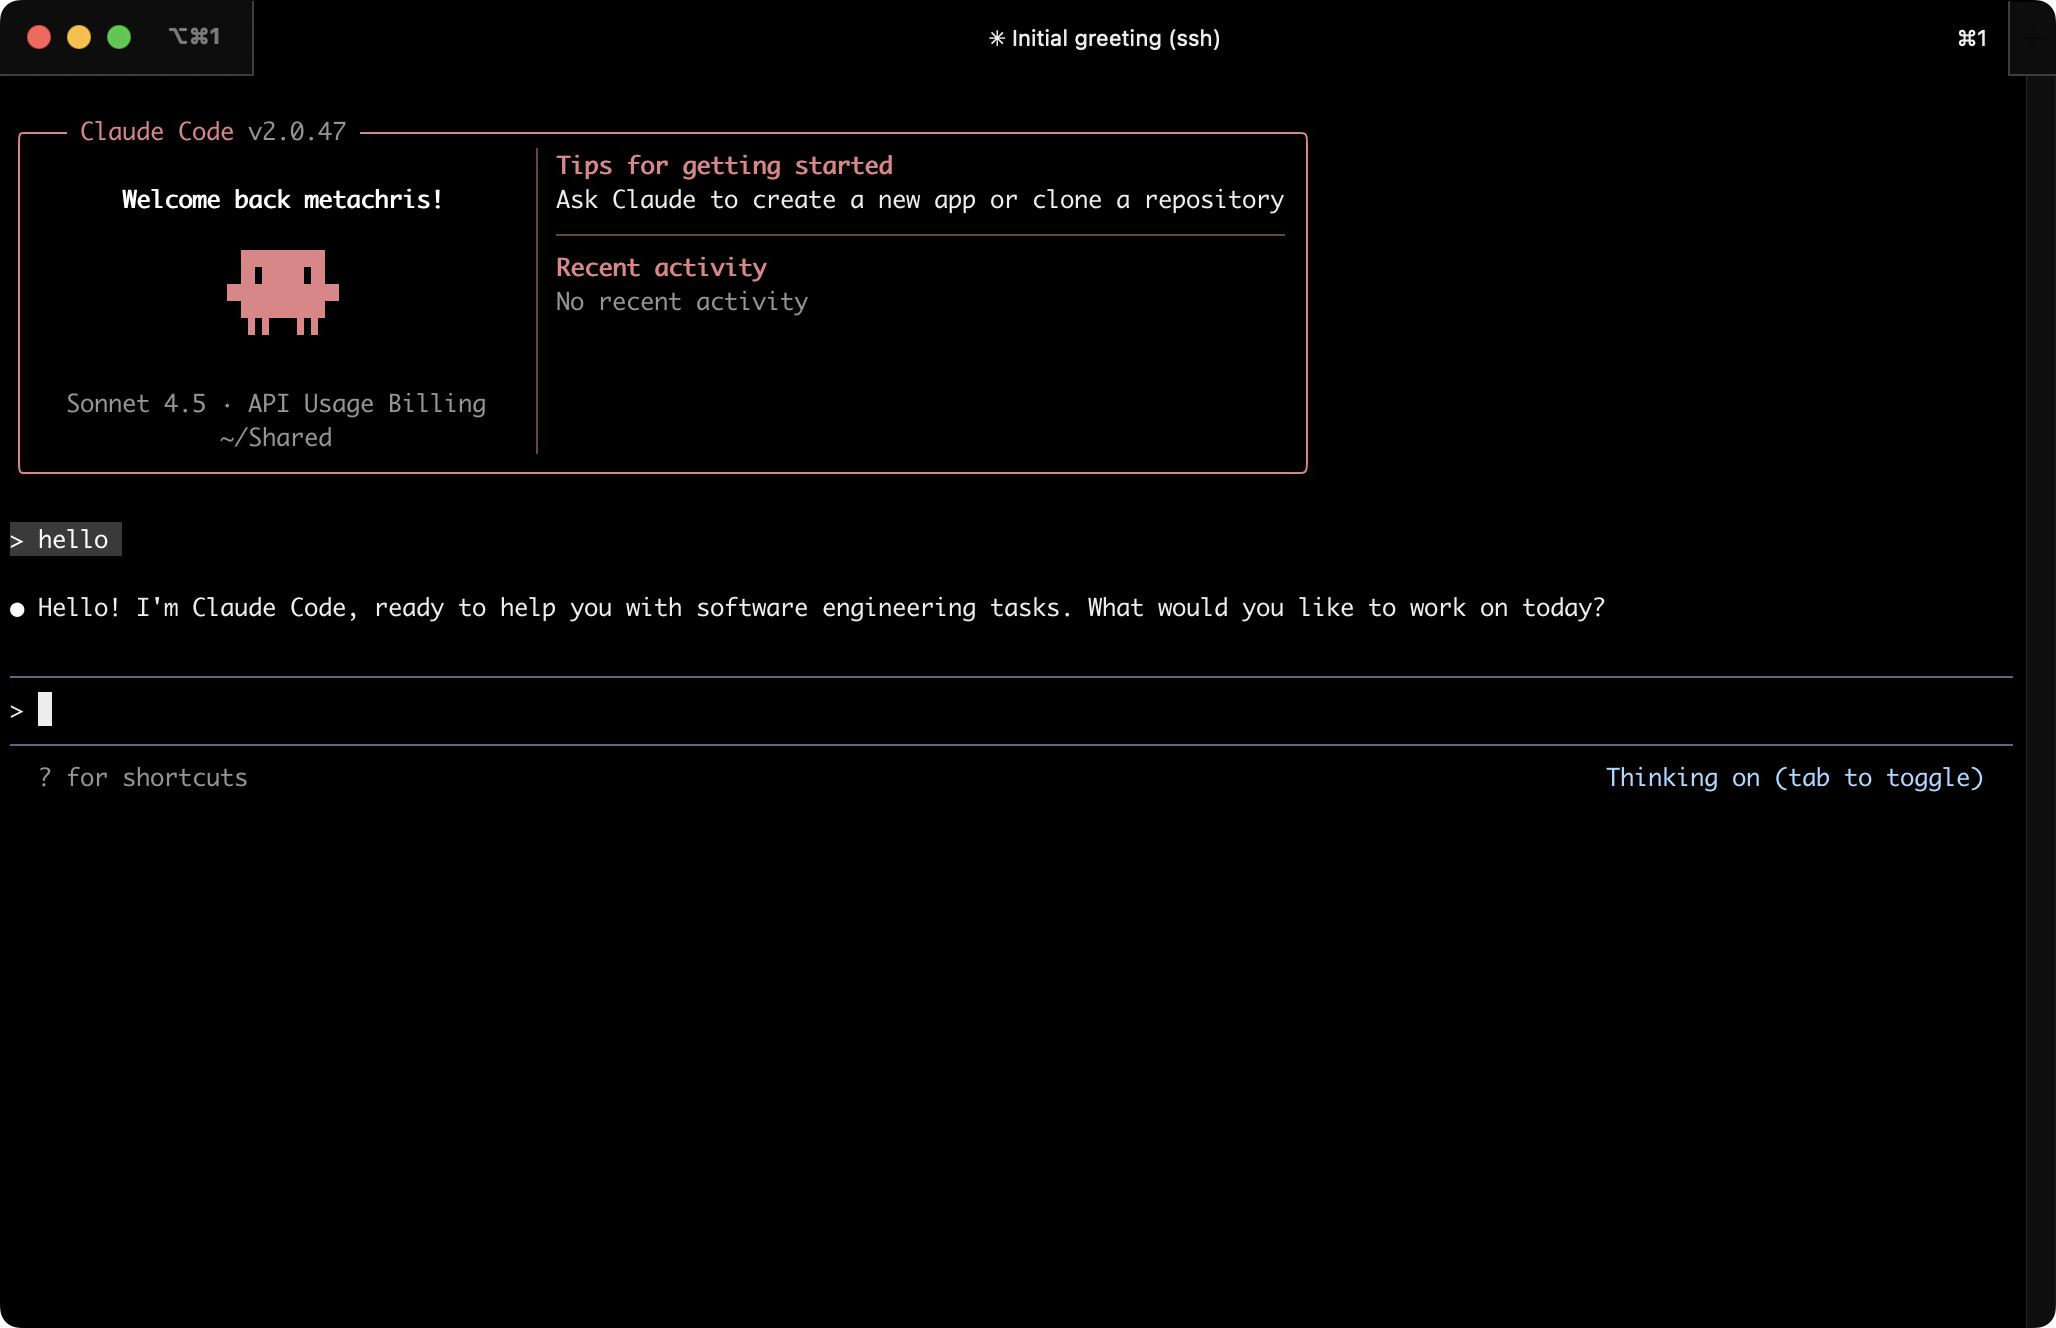
claude
On first start, Claude asks you to authorize it.
The docs mention support for an ANTHROPIC_API_KEY environment variable (i.e. set in .bashrc), but that did not work when I tried it; claude CLI didn’t let me skip the login process. Only after the login was done it notified me about the existing environment variable, and whether I’d prefer to use that one.
After the login, Claude Code CLI is ready to be ued in the VM! 🎉
Since Claude is running in a VM, it might be permissible to run it in “dangerously skip permissions mode”, which makes it bypass all permission checks:
claude --dangerously-skip-permissions
You could also create an alias for it and add it to your .bashrc:
alias claude="claude --dangerously-skip-permissions"
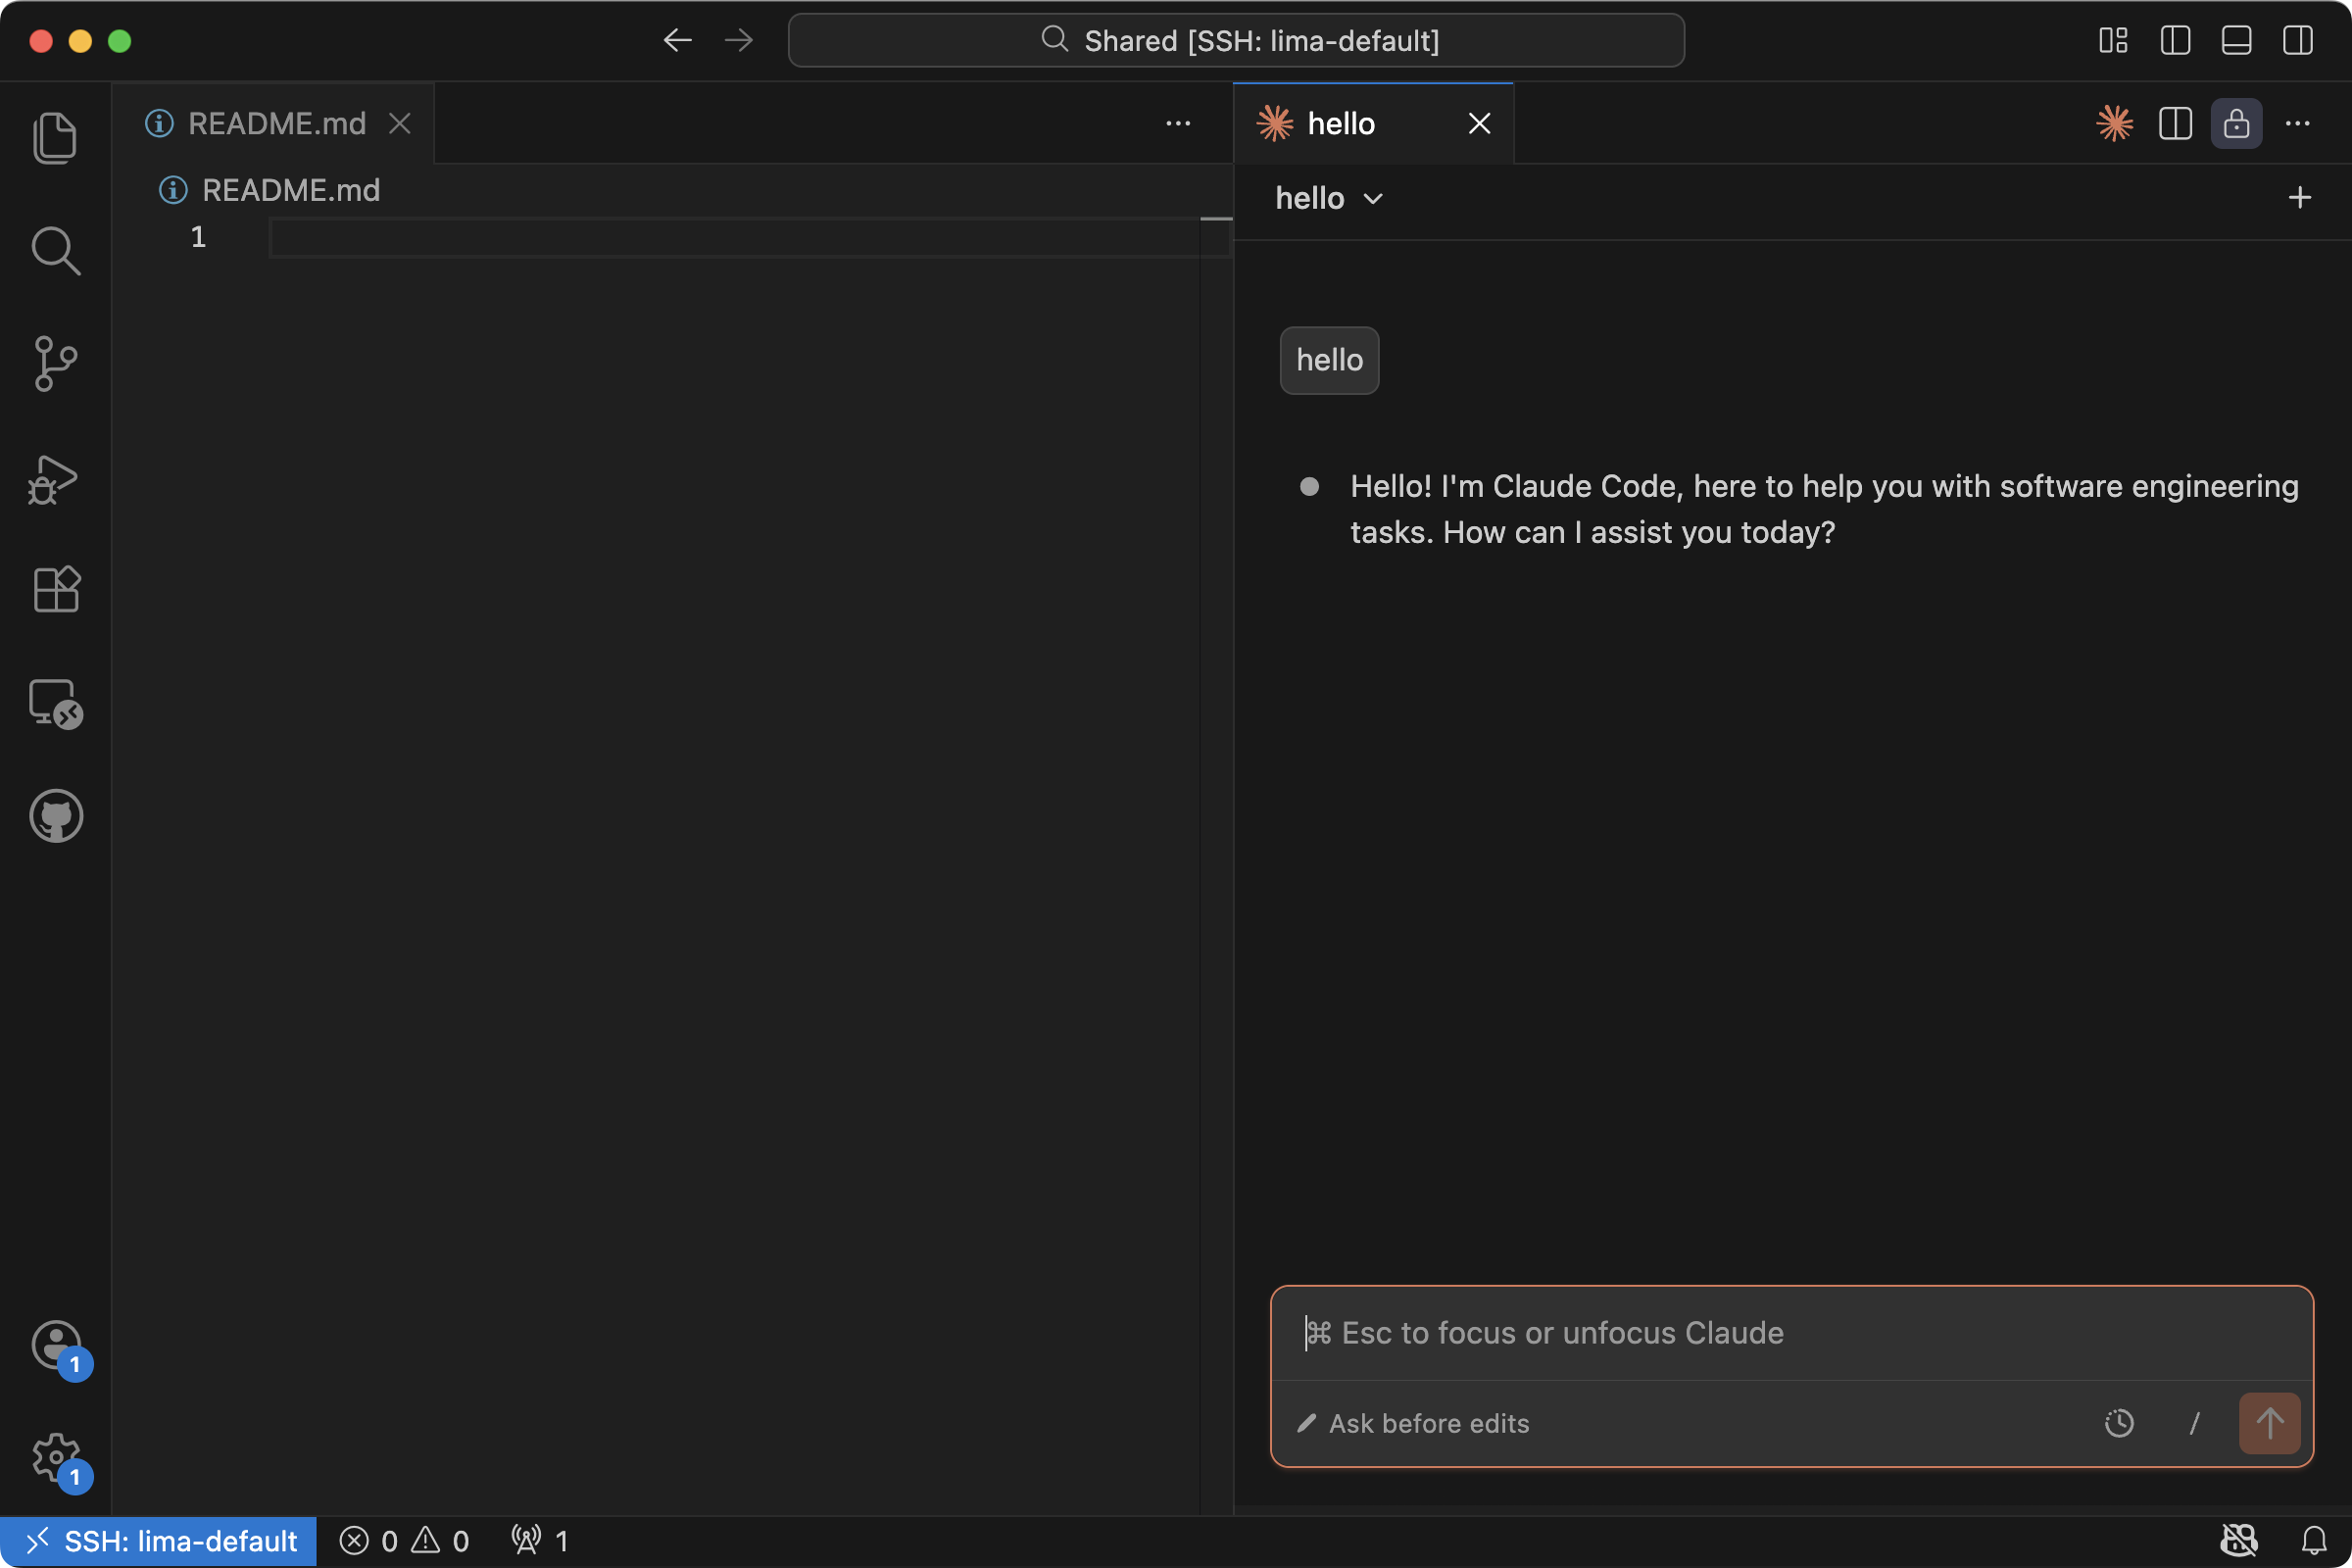
Claude Code VS Code Extension
Anthropic provides documentation for using Claude in VS Code, and also offer a VS Code Claude extension.
You can install the Claude extension in the VM through the Remote-SSH session window:

In contrast to the CLI tool, the authentication flow did not work through the user interface, and I had to set the ANTHROPIC_API_KEY environment variable:
- Create a new key via https://console.anthropic.com/settings/keys
- Edit
.bashrcand set the env var:
export ANTHROPIC_API_KEY=sk-ant-api03-x-y...
Reload the VS Code window (open command palette with Shift + CMD + P and choose “Developer: Reload Window”):

Now the VS Code Claude extension should work:
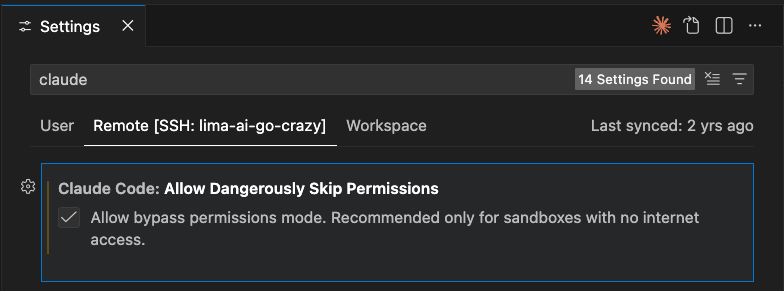
If you want to enable “dangerously skip permissions mode” in the VS Code extension, you can enable it via your user settings. Open the settings (CMD + ,), search for “claude” and enable “Claude Code: Allow Dangerously Skip Permissions”:
All done!
Gemini CLI
Let’s install Gemini CLI from Google next.
The documentation recommends installing it with npm, the Node.js package manager. You’ll need to install Node and npm first, see also the Node.js setup instructions.
Install Gemini CLI:
npm install -g @google/gemini-cli
Run Gemini CLI:
gemini
It will ask you to authenticate:
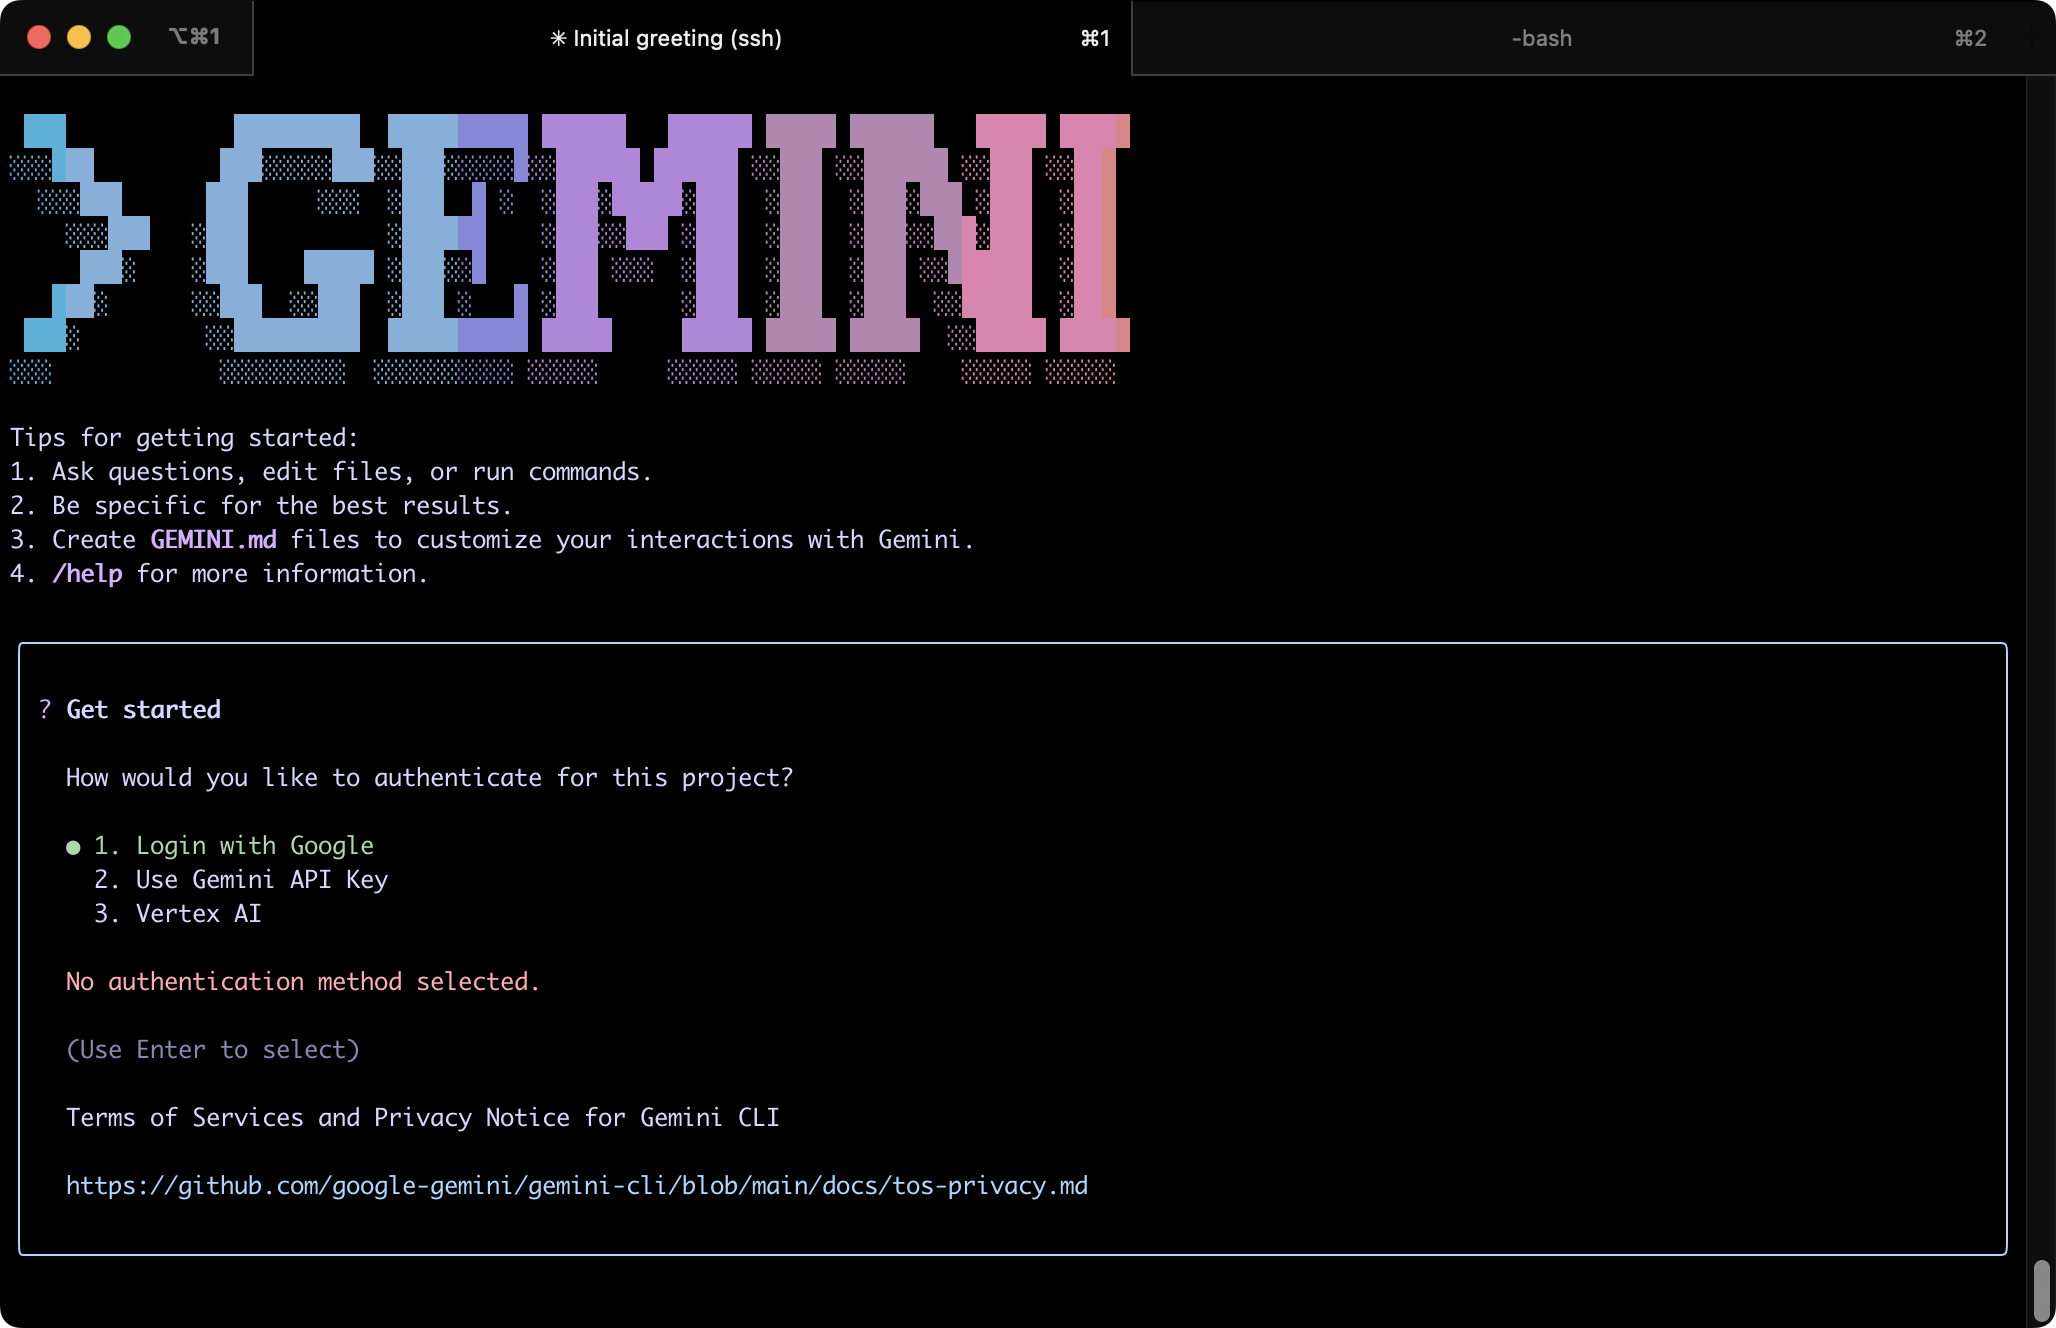
I chose “Login with Google”. Note that the authentication flow may require a retry if the first attempt times fails.
After authorization is done, Gemini CLI works!
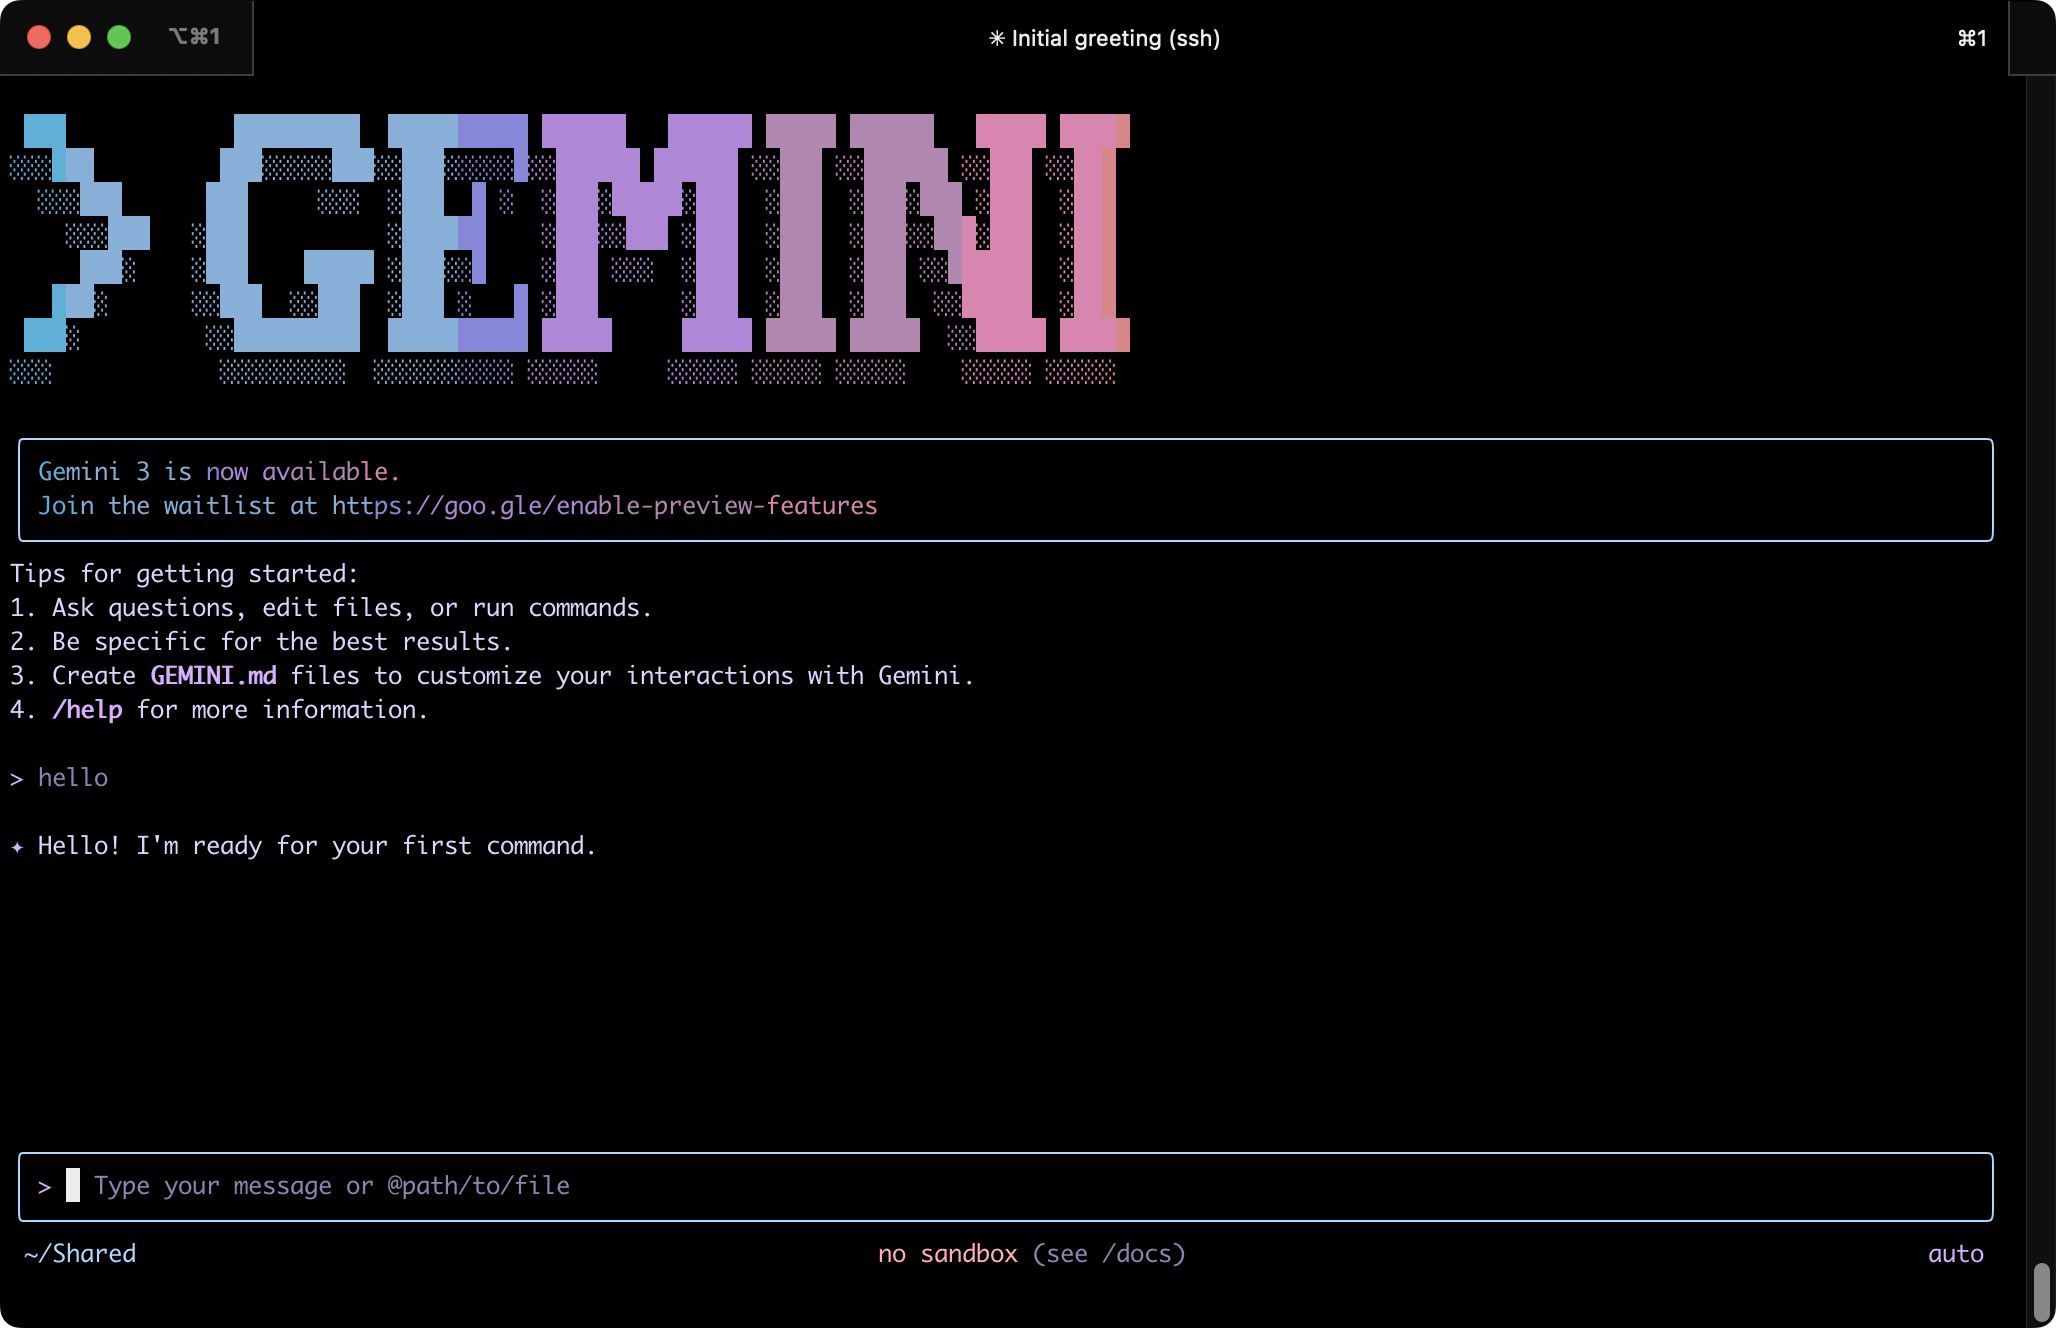
You can run Gemini in YOLO mode:
Automatically accept all actions (aka YOLO mode, see https://www.youtube.com/watch?v=xvFZjo5PgG0 for more details)
gemini --yolo
The alias you could define in .bashrc:
alias gemini="gemini --yolo"
Codex CLI
Codex CLI is the AI dev tool from OpenAI/ChatGPT.
Let’s install it:
npm i -g @openai/codex
Run Codex CLI:
codex
It will ask you to sign in, either via ChatGPT or by providing an API key:
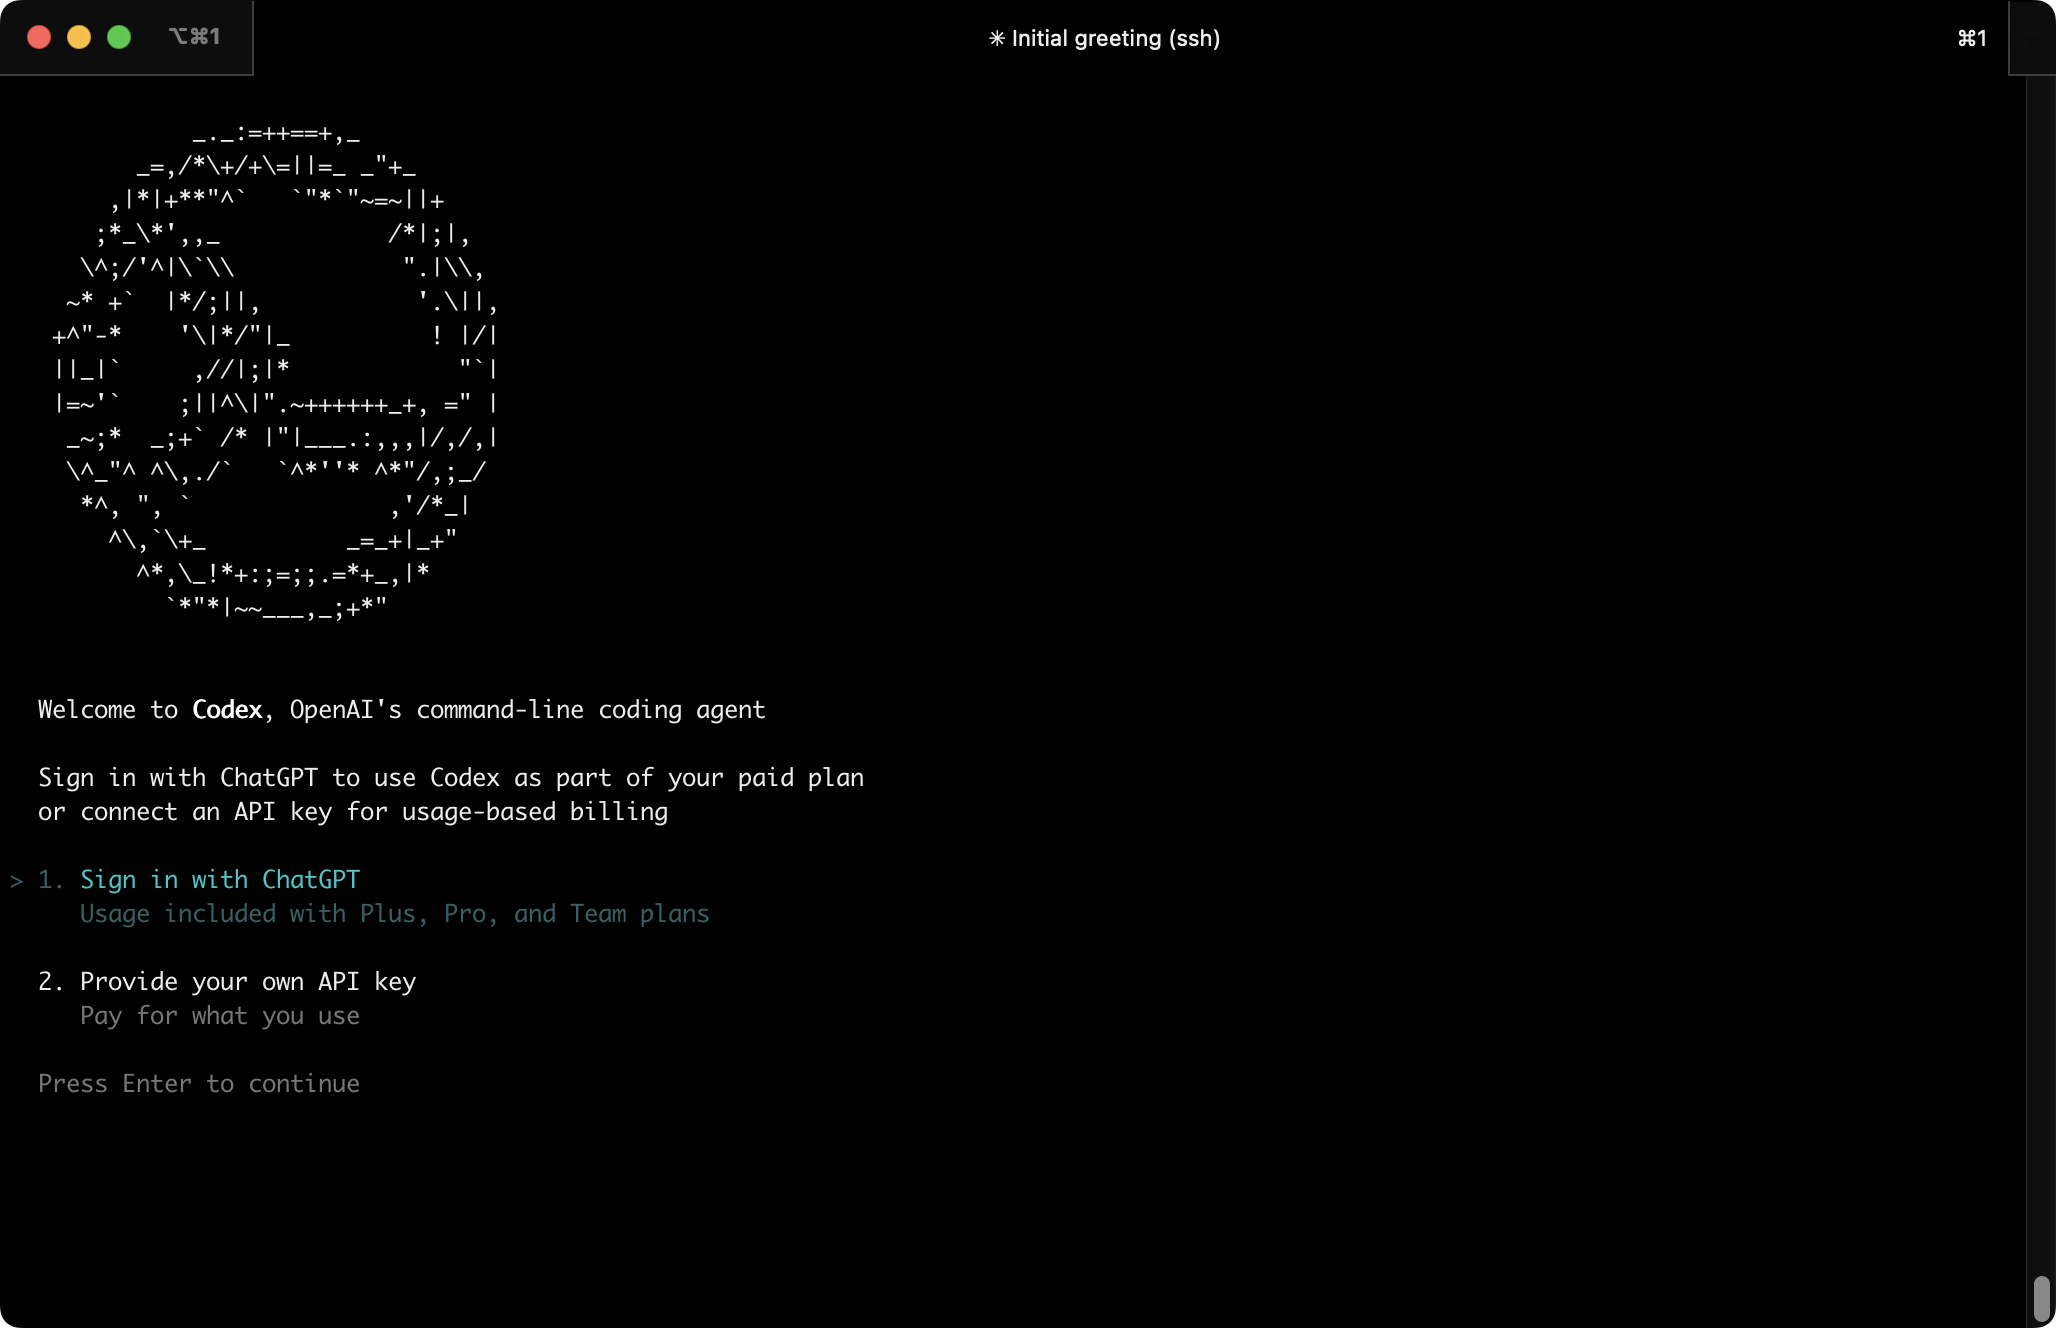
After that is done, Codex CLI is ready to work for you!
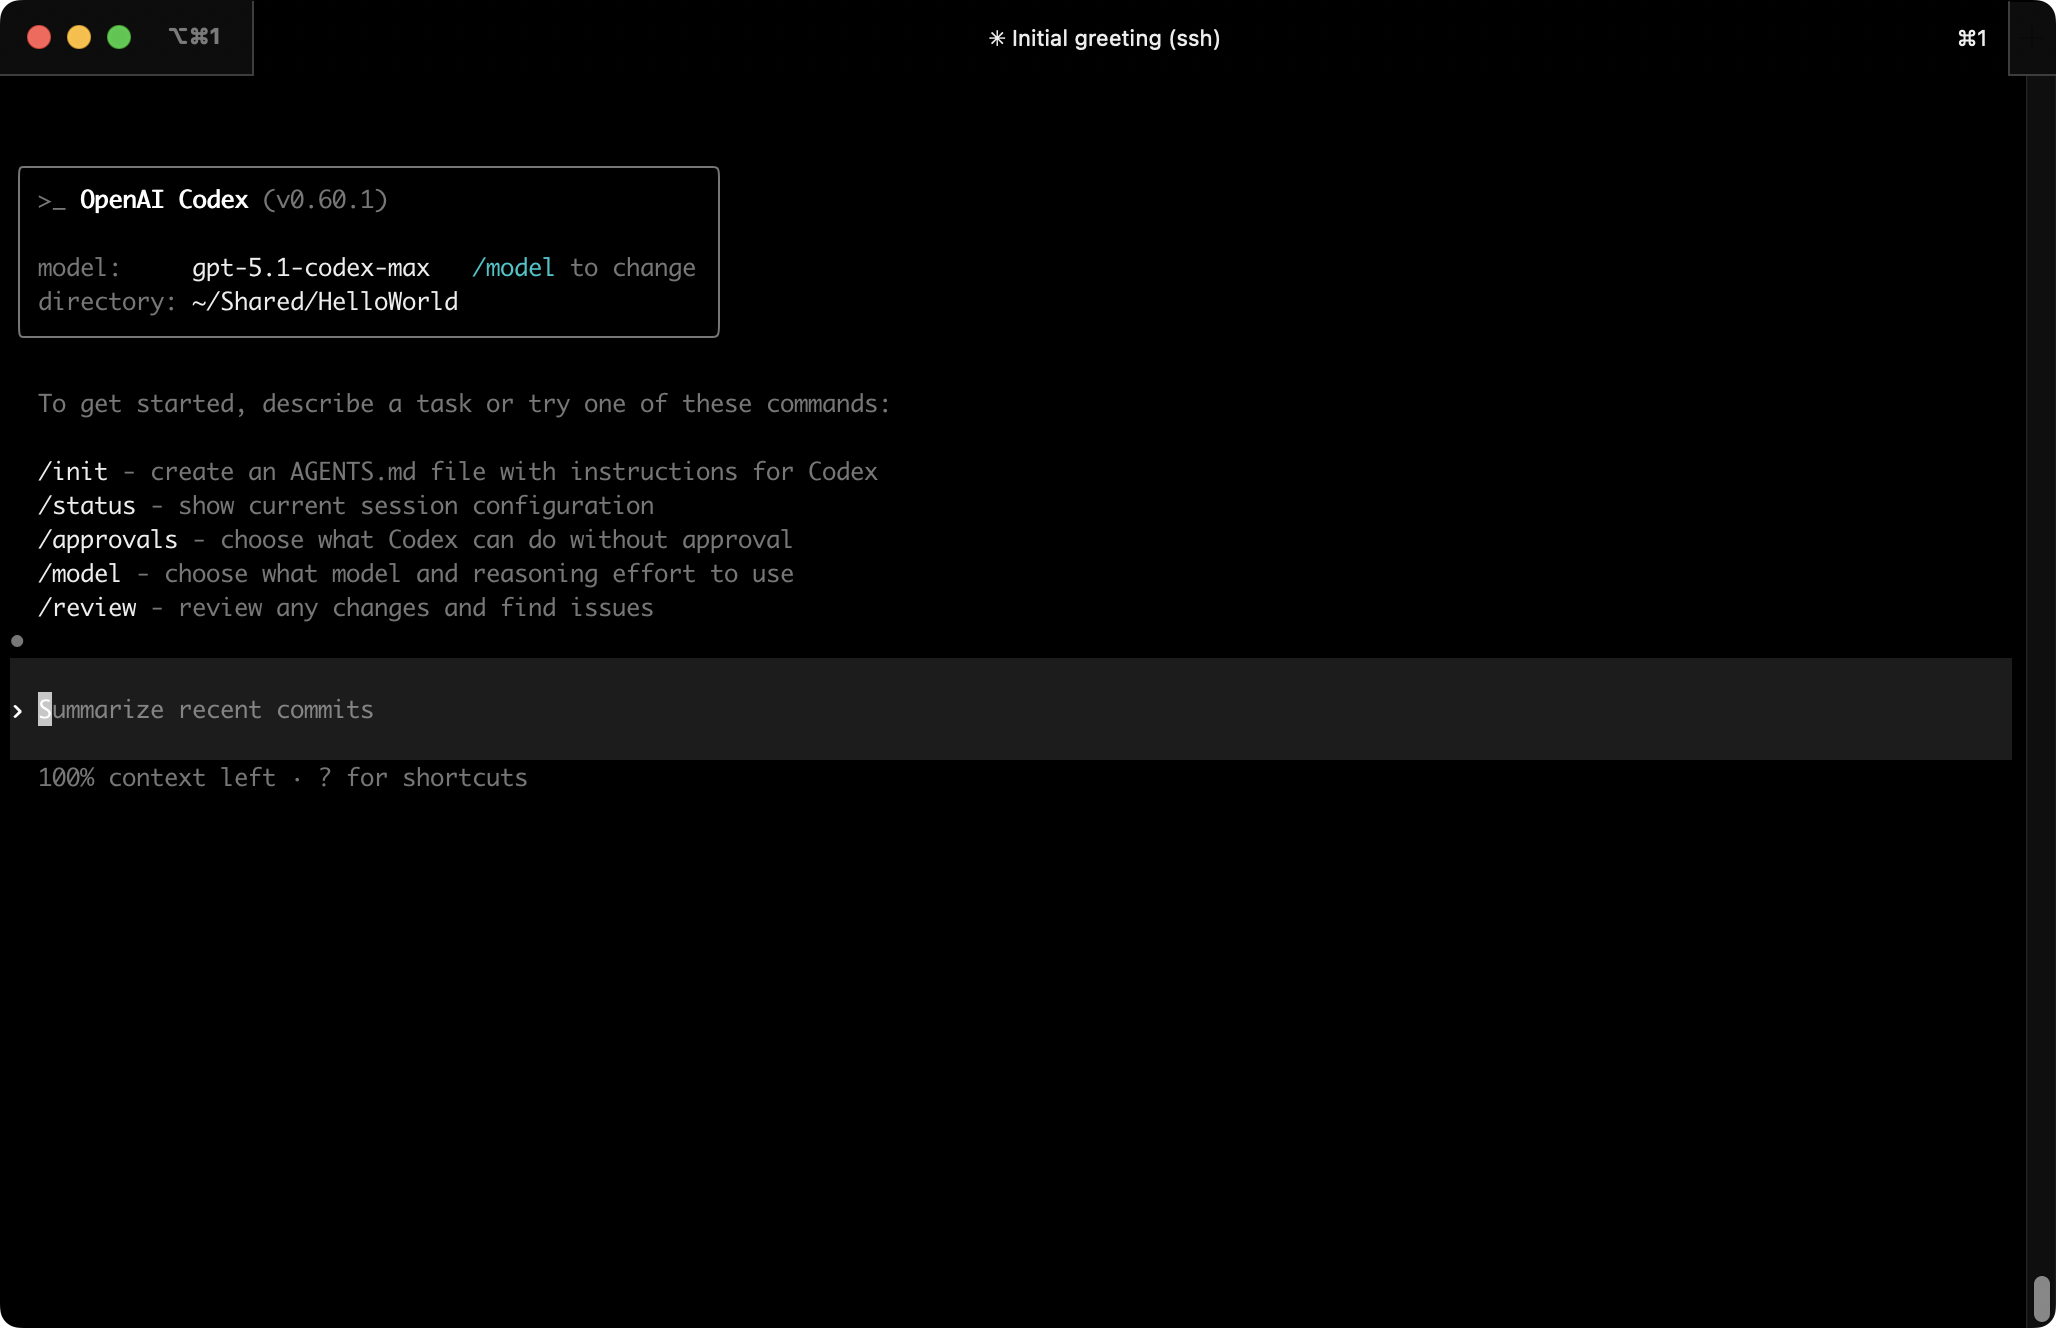
You can also run Codex in dangerous mode:
Skip all confirmation prompts and execute commands without sandboxing. EXTREMELY DANGEROUS. Intended solely for running in environments that are externally sandboxed
codex --dangerously-bypass-approvals-and-sandbox
The alias for your .bashrc:
alias codex="codex --dangerously-bypass-approvals-and-sandbox"
Other tools
There are several other great tools worth a mention:
- Aider - Command-line AI pair programming tool, works with multiple LLMs (GPT-4, Claude, etc.). Very popular in the CLI AI dev space.
- GitHub Copilot CLI - Command-line AI pair programming tool, works with multiple LLMs (GPT-4, Claude, etc.). Very popular in the CLI AI dev space.
- Continue.dev - VS Code extension that supports several LLM backends
- Cline - VS Code extension that supports several LLM backends
Drop your favorite tools in the comments below!
VM cloning and snapshots
VM clones and snapshots allow you even more flexibility and isolation. You can use them to quickly and cheaply run new VMs for experiments and specific projects based on already provisioned instances. Use them frequently!
Lima offers several ways to take VM snapshots and/or clone VMs.
- The command
limactl cloneto clone a VM. - The command
limactl snapshot, but it’s currently unimplemented for macOS. - Manual backup of important files inside
~/.lima/<vm_name>/(basediskanddiffdisk)
limactl clone
You can make a copy of an existing VM instance with limactl clone. The existing instance needs to be stopped first.
# Stop the instance
$ limactl stop dev

# Create a copy named dev-base
$ limactl clone dev dev2

# Show the help output
$ limactl clone -h
After all the initial VM setup is done, clone it and use it both as backup as well as a base for future instances:
# Create the "dev-base" clone
$ limactl clone dev dev-base --start=false

# Spin up a new instance "experiment123" based on it
$ limactl clone dev-base experiment123 --start=true
Remember that after starting a new instance, you probably want to symlink the VM SSH configuration to your ~/.ssh/config.d/ directory, so ssh knows about it (See also “SSH into the VM”):
# Create the SSH symlink
ln -s ~/.lima/experiment123/ssh.config ~/.ssh/config.d/experiment123

# SSH into the new instance
ssh lima-experiment123
Multi-VM workflows
For maximum security and flexibility, consider using multiple VMs for different purposes and trust levels. This approach provides better isolation and lets you tailor each environment to specific needs.
Here are some suggested VM configurations:
- dev-trusted - For known-safe projects with vetted dependencies. This VM can have slightly relaxed restrictions and potentially access to some credentials for deploying to staging environments.
- dev-experiments - For AI-generated code experiments and trying out new tools. This is where you let AI assistants run wild without worrying about the consequences.
- dev-dirty - For testing sketchy dependencies, unknown packages, or code from untrusted sources. Consider this VM completely compromised and never put any real data or credentials in it.
You can quickly clone your base VM setup to create new instances for different projects using limactl clone, as described in the VM cloning section above.
One VM per project
For sensitive or production projects, consider dedicating a separate VM to each project. This prevents potential cross-contamination between projects and allows you to mount only the specific project directories you need.
When creating project-specific VMs, you can customize the mounted directories by editing the instance configuration. Either adjust the mounts section before starting the VM (by not using the -y flag), or edit ~/.lima/<vm_name>/lima.yaml after creation and restart the instance.
This approach also makes it easier to share VM configurations with team members. Instead of sharing entire disk images, you can distribute just the Lima template YAML file, which team members can use to spin up identical environments on their machines.
For automated setup, Lima supports provisioning scripts that run during VM creation. For more complex setups, consider using idempotent provisioning tools like Ansible to ensure consistent environments across your team.
Creating custom templates
If you find yourself repeatedly creating VMs with similar configurations, consider creating custom Lima templates. Templates are YAML files that define VM settings, and they can include other templates.
Custom templates are useful for:
- Standardizing VM configurations across your team
- Pre-installing specific tools and dependencies
- Setting up project-specific mount points and port forwards
- Defining different security profiles (trusted vs. experimental)
You can create a custom template by copying and modifying an existing one from Lima’s template directory. Save your custom templates in ~/.lima/_templates/ and reference them when creating new VMs:
limactl start --name myvm ~/.lima/_templates/my-custom-template.yaml
See the Lima templates documentation for more details on template syntax and available options.
Best practices
Here are some important security best practices to follow when using VMs for development:
✅ DO:
- Use separate VMs for different trust levels (production, experiments, untrusted code)
- Take snapshots before risky operations or installing unknown dependencies
- Keep your VM software and tools updated regularly
- Mount only the specific directories you need, not your entire home directory
- Use the shared directory (
~/VM-Shared) for transferring files between host and VM
❌ DON’T:
- Store real credentials, API keys, or SSH keys in experimental VMs
- Mount your entire home directory into the VM (Lima’s default behavior)
- Give VMs access to sensitive files or directories on your host
- Authorize AI tools with access to private repositories unless you accept the risks
- Run untrusted code on your host machine, even “just to test quickly”
Remember: The whole point of using VMs is isolation. When in doubt, create a new VM for risky experiments and delete it afterwards.
I hope this guide helps you get started quickly and right-footed! As always, please leave feedback, questions and ideas in the comments below.
Have fun coding! 🛠️
Special thanks to Ilya Lukyanov and Overflo for reviewing drafts of this post and making great suggestions. 🙏
Enjoyed this post? Subscribe to get notified about new articles.